Getting Started with git and the command line#
This page covers the basics: creating a repository and making commits.
Setting up Git#
Git commands have the structure of git <verb> <options>, where
<verb> denotes what action we want to take and <options> are the
arguments, which we pass to the command.
Before we start, we first need to locally set up the git environment, so that when we make changes, we can be identified as the author of those commits. Open git-bash on your computer and type the following lines in the command line interface and use your name and email address between the quotation marks.
Since you will be uploading your progress on a university instance of Gitlab, it is recommended to use your student email when committing.
git config --global user.name "Kiril Vasilev"
git config --global user.email "k.v.vasilev-1@student.tudelft.nl"
Console example in Fig. 83:

Fig. 83 Setting up name and email to use for git#
Note that in the commands above you do not need to type the $
sign.
Creating a repository (from scratch)#
Open git bash and go to the desired directory, where you wish to set up
your repository. You can use the commands cd to move through
directories and ls to list files in the current directory. Have a look
at Fig. 84, where
we move to the location where we want to set up our new repository.
Namely, we wish to set up our repository in a new folder called
my-new-repository, which is inside the folders TUDELFT/Year 2/ Quarter
1.
Note that it is not necessary to create a new folder before creating a new repository. You can make a repository in an existing folder as well.
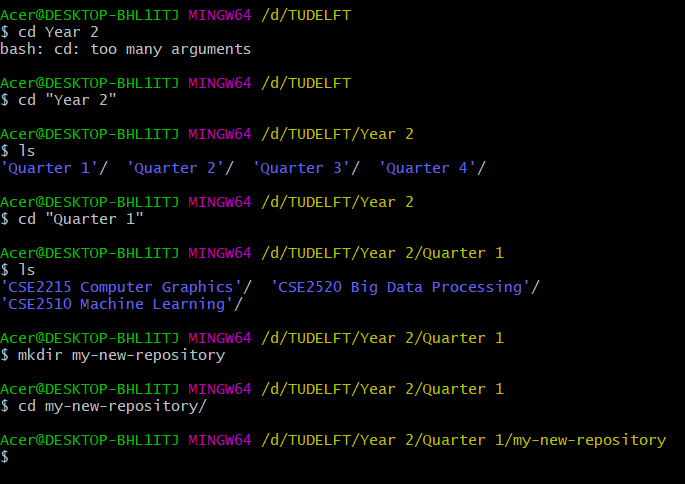
Fig. 84 Creating a folder for a new repository#
Note that the command output above is based on Windows Git-Bash. The commands will have the same effect on Linux and MacOS, but the visualisation of changing directories may slightly differ.
Now that we have moved to the location we want, we can initialize the
repository using the command git init.
Note that it is not necessary to call the command above for every subdirectory of your project. We only use it once per repository, so you should only call it on the root folder of your project.
Finally, we will also use the command below to move to the main line
of development, where we will be making changes next. By default, git
has started using main as initial branch, however, depending on your git
version/distribution it is possible to have master as default branch.
(Fig. 85).
git checkout -b main
Note: the command above can be regarded as executing both git branch main and git checkout main at the same time. Later in this tutorial, we will cover what branching means and why it is useful for the development process.
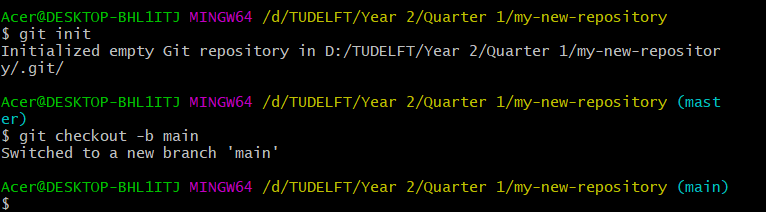
Fig. 85 Creating a new branch main#
You can now begin making new files and working on things inside your repository locally.
Your first commit#
It is good practice to set up a markdown file README.md for your projects, where you explain what your repository contains, how to use it, who created it, how to contribute to it, repository license, etc. This can be accomplished by running the following command and editing the file, which was created via notepad or any other text editor that your operating system has. For instance, nano or vim, which should come installed with Git Bash. (Fig. 86).

Let us put the following text inside it:
# About the project
This is a test project, where we learn how to use the git version control system.

# Usage
The project has no particular usage or any programming files to run.

# Contributors
Kiril Vasilev -  k.v.vasilev-1@student.tudelft.nl
You can replace the contributors name and email with yours. Save the
file and run the command ls to verify that you have successfully made
a new file as seen in Fig. 87.

Fig. 87 Checking if file was created in our current folder#
Use the command cat "README.md" to show the contents of the file and
verify they are correct (Fig. 88).
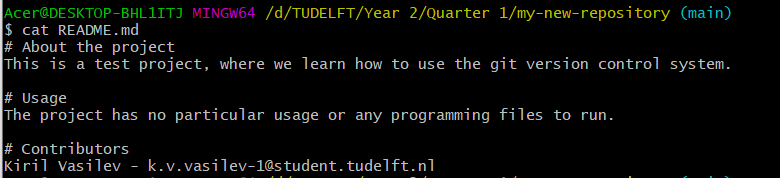
Fig. 88 Check contents of file using cat command#
Use the command git status to check tracked and untracked files in
current repository (Fig. 89).
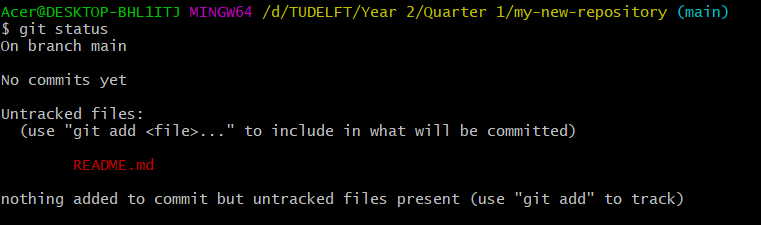
Fig. 89 Running git status#
Since we want to commit our new file, we first need to stage it. That is
track it, so that git knows about it and will add it to the repository
in the next commit. Let us call the following command:
git add "README.md". This will track the file. Alternatively, we can
also use git add * , which will add all files in the current directory
and all subdirectories to the staging area of the repository.
Figure Fig. 90 shows the steps we explained, namely we first
make changes to the files. Next, we stage those changes via git add
and finally we commit (save) those changes to the repository with
git commit command.
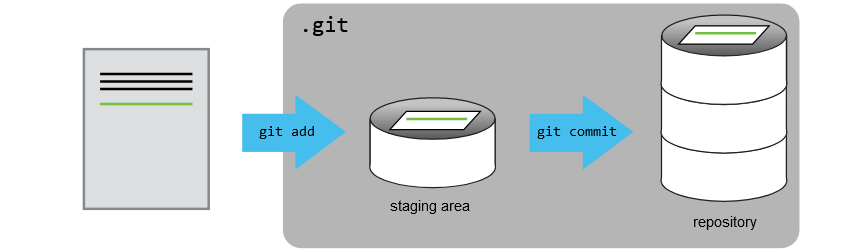
Fig. 90 Steps to commit a change in a file#
We can call git status again to check if the file is now being tracked
(Fig. 91).
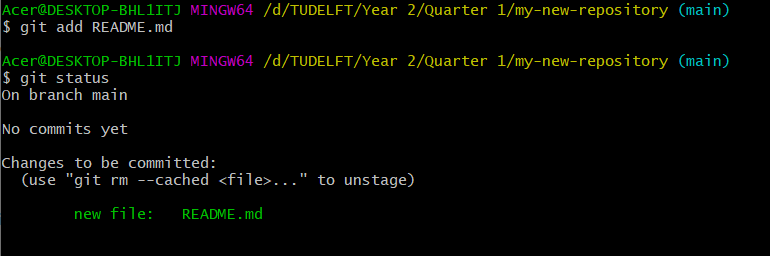
Fig. 91 Checking tracked file#
Finally, we can make our first commit!
Run the command git commit -m "My first commit". Note that you can
have a different commit message simply by changing the text between the
quotations (Fig. 92).
It is important to have clear commit messages that show what each change does. A common convention is to have the commit messages in imperative form following this structure: one line giving a summary of the commit, one empty line, followed by a paragraph explaining more in depth the commit. Note that a one-line summary is also sufficient for a commit message. Therefore, a more appropriate message would be “Add README.md file”.

Fig. 92 Committing changes#
Tip: When writing a commit message, it is often useful to imagine completing the following sentence: “This commit will …”. For example, using the commit message above, we will end up with the sentence: “This commit will add README.md file”.
Congratulations! You have now completed your first commit of changes via
git. Calling git status will show us that there are no new changes,
and everything is up to date (Fig. 93).

Fig. 93 Check for new changes#
Comparing commits: log and diff#
As we have previously mentioned, one of the key advantages to Git is that it allows you to track changes and see what has been changed, when and by whom via commits.
Run the command git log to get that summary (Fig. 94).

Fig. 94 Checking commit history#
We will now modify our README.md file by adding a line at the end of the file, specifying the date it was last modified and changing the “About the project” section:
# About the project
This is a test project, where we learn how to use the git version control system.

# Usage
The project has no particular usage or any programming files to run.

# Contributors
Kiril Vasilev - k.v.vasilev-1@student.tudelft.nl

Last modification: 30.04.2022
We stage the file and commit the changes (Fig. 95).
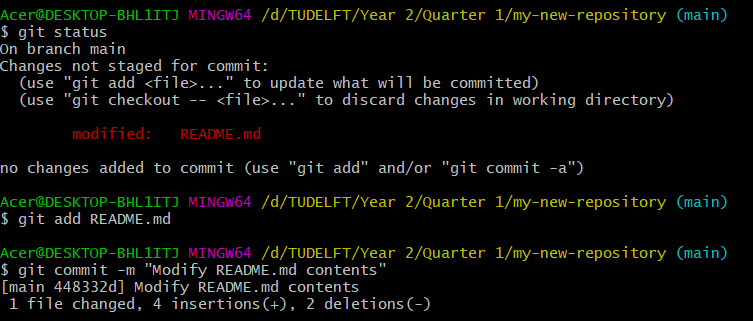
Fig. 95 Stage and commit new modificaiton#
Running git log now shows us the two commits we have made (Fig. 96).
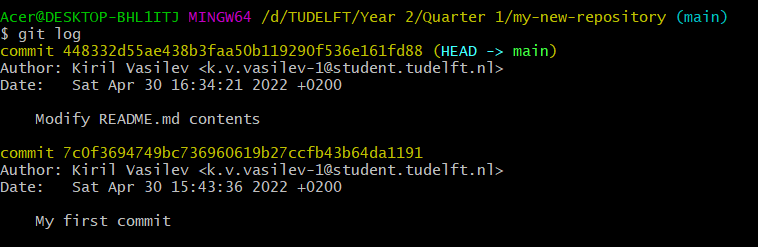
Fig. 96 Two commits we made#
It is important to note that every commit is associated with a unique
identifier. For example, our first commit has the identifier
7c0f3694749bc736960619b27ccfb43b64da1191 and our second commit has the
identifier 448332d55ae438b3faa50b119290f536e161fd88.
We can call the command git diff 448332d 7c0f369 to show the
differences between the two commits in terms of changes of files. Note
that, the first 7 characters of the commit id are enough to identify it
in commands (Fig. 97):
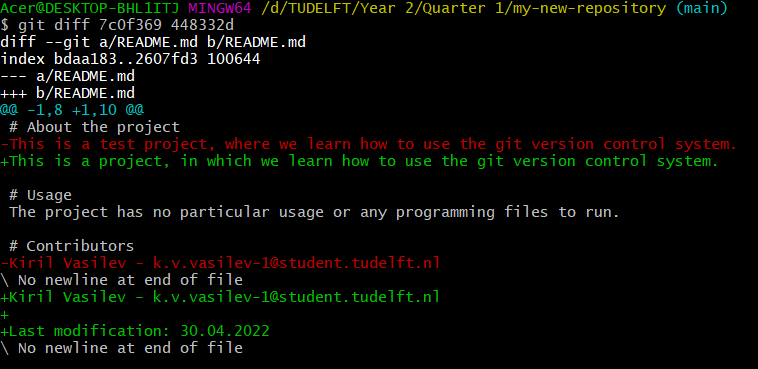
Fig. 97 Difference between two commits#
The new additions are shown by a leading + and deletions by leading — to their respective row.
Note that swapping the commit identifiers also swaps the way changes are displayed (Fig. 98).

Fig. 98 Difference between two commits swapped arguments#